Tuesday, May 15, 2012

Casino Theme Couples Wedding Shower

A few pictures of details from the casino-themed couples shower/party . . . .

Box for loose greeting cards.


Guests wrote messages to the lucky couple on a deck of white/blank-back playing cards (found on Amazon.com).


"Pick a card, any card!"


Elvis made an appearance to deliver the message, "Thank you for celebrating with us!"


Black and white Linzer heart cookies from Foodstuffs were a casino-like favor.


Swirlz mini cupcakes are one of my party staples.  Delicious, and much more approachable that full-sized cupcakes!  


Whole Foods flower bouquets re-arranged into small vases, playing cards stamped with "T&A," purple heart confetti and gold chocolate coins served as table centerpieces.


More cupcakes on the bar.


My first project with my new Silhouette Cameo cutting tool (thanks, Mom!) is impossible to see in these pictures.  I used the tool to cut big letters and mounted the letters on playing cards with spray adhesive.  Strung together, the cards created a "Tiffany & Andy SigeRICH in LOVE" banner that hung over the pizza and salad buffet table.


Sunday, May 13, 2012

Casino Theme Shower Invitations

I took inspiration from these vibrant Vegas-themed invitations and played on my girlfriend's future last name (Sigerich) to create a casino-esque theme for their couples shower.  "SigeRICH in LOVE" was the tag line for the invitations and other creative elements of the shower decor.  The casino/Vegas theme is great for a wedding shower with lots of uses for HEARTS and CLOVERS (lucky in love, the lucky pair . . . )!  


I tried to emulate the typography-style invitations and stationary I've been eyeing in stores and on other blogs of late.  I used the following fonts, all either free from dafont.com or standard on a Mac:   
  • AdamGorry - Lights - hard to tell from these photos, but looks somewhat marquee-like)
  • Brush Script MT
  • Charcoal CY
  • EcuyerDAX
  • Ecolier_court


My apologies for the blurry photography . . . Playing cards served as both a decorative tag and a method to relay registry information:  "Don't roll the dice, make a sure bet at Macy's & Williams-Sonoma."  I attached the cards with red and white Baker's twine

Sunday, March 11, 2012

OMG (congratulations!)

We have arrived at an exciting stage in life and feel oh so happy to celebrate wonderful news of babies and marriage with our loved ones!  I created these note cards to express this joy to our friends.


Thursday, February 23, 2012

Preppy Print Key Chain

I am always misplacing my work keys on my busy desk, so I decided to make a fun key chain to help them stand out among the clutter.  I designed some bright prints and loopy monograms on my computer, and cut them to fit a 2x3 photo key chain.


Tuesday, February 14, 2012

Burnin' Love Valentines

Happy Valentine's Day!


I took inspiration from a matchbook greeting card I saw at Papyrus for my Valentines this year and re-created a version of my own.  I LOVE the matchbook, heart-tipped matches, and "burnin' love" message.


Sending you wishes for a HOT Valentine's Day!  :-)

Tuesday, February 7, 2012

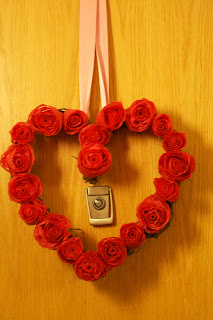
V-Day Rosette Wreath

My weekend craft project was cheap and simple!

Materials used:
- two small rolls of crepe paper
- heart wreath from Michael's
-  basic glue (i.e. Elmer's)
- hot glue gun
- ribbon


The project is delightfully simple!

1.  cut the crepe paper in various lengths

2.  crinkle the crepe paper in a ball to add more texture and volume

3.  unwind the crepe paper and start to roll into a rosette, starting with a tight roll in the center, and loosening as you go to create the effect of the petals

4.  use a bit of Elmer's glue to hold the end in place

5.  hot glue the rosette to the pre-made wreath

6.  finish with a ribbon and anchor to your door!


I was inspired by a similar wreath for sale on Etsy, and took some tips from this great tutorial.

Wednesday, February 1, 2012

Ode to Cards of Valentine's Days Past

February arrived today -- where does time go?!  January seemed to speed by especially fast this year because of the delightfully mild winter we've been experiencing in the Midwest.  Keep it coming!

To celebrate February's dawn, a look back at my handmade Valentine's Day cards from the past two years . . .

2011

2010

Sunday, January 29, 2012

Picture-Perfect Birthday Invitations

Here are some images of the paper invitations I made for my dad's 60th birthday.  After seeing these photo-booth inspired invitations from Martha Stewart, I just had to use the precious photo strip of my dad (trying to figure out how to work the photo booth) from our wedding.


I stuck with the black, white, grey and red theme and used silver photo corners and brads to complete the invites!


Check out the rest of the party details here!

Picture-Perfect Birthday Party

My dad turned the BIG 6-0 in early January, so we threw him a surprise birthday party!  I believe the final headcount came to 75 . . . impressive that my dad has so many friends after ALL of these years!  ;-)

This article in Martha Stewart magazine from January 2011 provided inspiration for the photo-themed party.  In place of Martha's yellow, I used red as my accent color to the black, white and grey color scheme to tie in NIU Huskies colors (my dad is an alumnus and a huge  NIU sports fan).    

I asked guests to send old photos of my dad for a slideshow, and arranged black and white copies of some of these photos to create a "60" sign.


I found these amazing beer mugs at Dollar Tree and used photo corners to affix a photo to each glass.  Leftover pictures from the party invitations and silver-wrapped mints served as confetti.  Easy and affordable table centerpieces!


Noise makers were ready for the SURPRISE! in coordinating cardboard six-pack carriers.


Guests were asked to leave a message for the birthday boy.  Love the look of silver Sharpie on black paper!


Mini cupcakes from Swirlz - YUM!


Lots of beer was consumed at the party, so the koozie favors were used from the get-go!  Shout-out to CustomInk -- I was impressed with their superior customer service!


Happy Birthday, Dad!!!  XO


Saturday, January 14, 2012

Healthy Cookie Recipe


HEALTHY cookies?!  Yes!  Check out this great recipe from a cooking class I took with food and nutrition expert, Dawn Jackson Blatner, RD.  Her website is an excellent resource for creative, healthy and fairly straightforward recipes.  I get excited when I find new uses for quinoa and flaxseed, and this recipe combines both!  I just made these cookies to take to a winter BBQ tomorrow afternoon and my belly is happy to report that they are delicious!


Peanut Butter Quinoa Cookies


Ingredients
  • 1 C quinoa
  • 2 C water
  • 1/2 C natural chunky peanut butter
  • 1/4 C honey
  • 1 C rolled oats, pulsed in a food processor to reach flour-like consistency (I used my Magic Bullet's flat blade)
  • 1/4 C ground flaxseed
  • 1/2 tsp sea salt
  • 1/4 C mini dark chocolate chips (or more to taste)
Directions
  1. Preheat oven to 350 degrees F.
  2. Bring quinoa and water to boil, cover and simmer for 10-20 minutes until water is absorbed.  Remove from heat and let cool.
  3. Mix 2 C cooked quinoa with peanut butter and honey.  Reserve remaining ~1C quinoa to eat with salads, etc. later in the day/week.
  4. Stir in oats, flaxseeds and salt until well-combined.  Mix in chocolate chips.  (note:  Chocolate chips may melt if quinoa isn't completely cool.  Upside of warmish quinoa = ease of mixing peanut butter).
  5. Line 2-3 baking sheets with parchment paper.
  6. Use mellon-baller to drop ~ 1 T-sized mounds on baking sheet.
  7. Bake cookies for 18-20 minutes, until bottoms/edges are golden
  8. Press cookies flat using the bottom of a small drinking class immediately after removing from the oven.  Let cool.
Dawn's recipe yields 36 cookies for nutrition content of 60 calories, 3g fat, 1g fiber, 3g sugar, and 2g protein for each each cookie.  My mellon baller must be bigger than 1 T as my batch yielded 26 cookies with slightly more nutrition goodness in each.  Still healthy and delicious!


Happy New Year!!!


Hello!

After a loooong hiatus, I'm back in blogland!  Like most people, I've set goals for 2012.  My most relevant goal being to better document my craft endeavors and subsequently blog about them.  Since I made zero posts in 2011, I'm already off to a good start! :-)  Where did the year go?  No excuses, just busy like everyone else.  Watch for a few posts back-filling key parties and projects from the past year.  I do regret that I failed to photograph and document some good ones (Halloween 2010 and St. Patrick's Day book club 2011 to name a few).  More to come!

XO,
Abby